

Happy March and National Craft Month. In honor, here’s another one of Mom’s crochet patterns for a “V Stitch Pullover Vest” as seen in her self-published newsletter, Gloria Pitzer’s Secret Recipes Newsletter (Secret RecipesTM, St. Clair, MI; July-Aug. 1988, p. 11). As always, asking only for proper credit if you wish to share it.

V-STITCH PULLOVER VEST
By Gloria Pitzer, as seen in her self-published newsletter… Gloria Pitzer’s Secret Recipes Newsletter (Secret RecipesTM, St. Clair, MI; July-Aug. 1988, p. 11).
I have probably mailed out a hundred copies of this pattern since I wore my vest when I conducted recipe seminars here and there! Made with the v-stitch(2 DC stitches made in the same space), I alternate colors, using white for one row and navy for the next, etc., across – and some with 4 shades of pink, each row a different shade. It takes about three evenings of spare time to complete one.
INGREDIENTS/ITEM NEEDS:
For all sizes:
6 skeins (2-oz each) Red Heart 2-ply or 14-oz 3-ply yarn
Crochet hook [for size]:
J-hook – X-Large
I-hook – Large
H-hook – Medium
G-hook – Small
INSTRUCTIONS*:
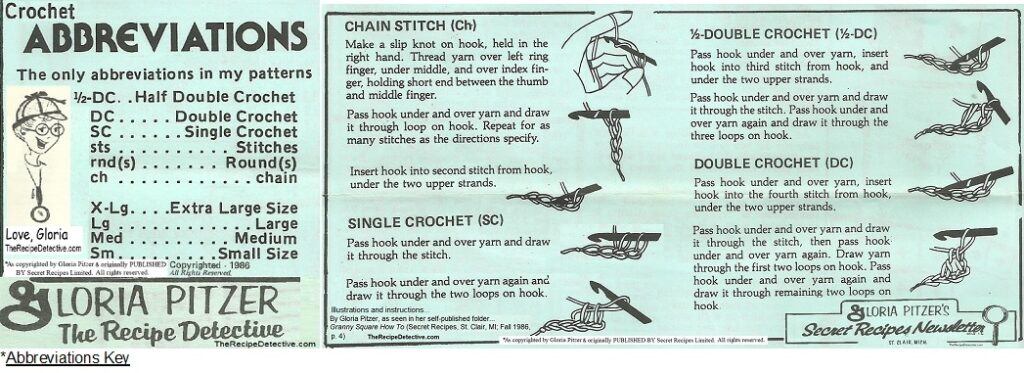
[*See photo (above) for crochet abbreviations and descriptions.]
Chain 76 sts. Insert hook into 4th chain from hook and DC 2 sts in that space. Skip 1 chain. DC 2 sts in next space. Skip 1 chain and repeat across to within 3 chains of the end. Work 1 DC into last chain.
Chain 3 sts for 1st stitch of next row. (*If changing colors, attach new color of yarn 1st.) Turn work and work 2 DC sts in between each of the 2 DC sts of previous row, [going] across. Remember 1 DC stitch at beginning and at end of each row, for 48 rows. Each row has 36 V’s. [Make 2 complete panels, for front and back, before crocheting the seams together.]
SC side seams from hem edge to underarm for 21 V’s, on wrong side [inside] of garment. SC shoulders, from shoulder edge to neck, for 16 rows. Finish neckline, working 2 DC sts in each space around for one row and reverse SC (working left-to-right instead of right-to-left) to finish.

Arm holes: Work one row of reverse SC around, using 1 stitch in each space around.
Waist band: Work with ½ DC stitch made in each space around for 8 rows.
IMPORTANT: Steam press finished garment or it won’t fit properly. Place garment flat on towel on [flat] hard surface. Wring out a dampened man’s handkerchief. Have iron on “wool setting”. Do not slide iron over handkerchief. Place it on hankie for only a few seconds until you hear “hissing” of moisture evaporating with heat of iron.
[NOTE: Move dampened hankie (you’ll have to re-dampen it as you go) and repeat process until garment is fully pressed.] Hang up on hanger until completely dry before wearing it.
LAST THOUGHTS…
For questions or comments, you can email me at therecipedetective@outlook.com. I’m also on Facebook: @TheRecipeDetective.

See also: